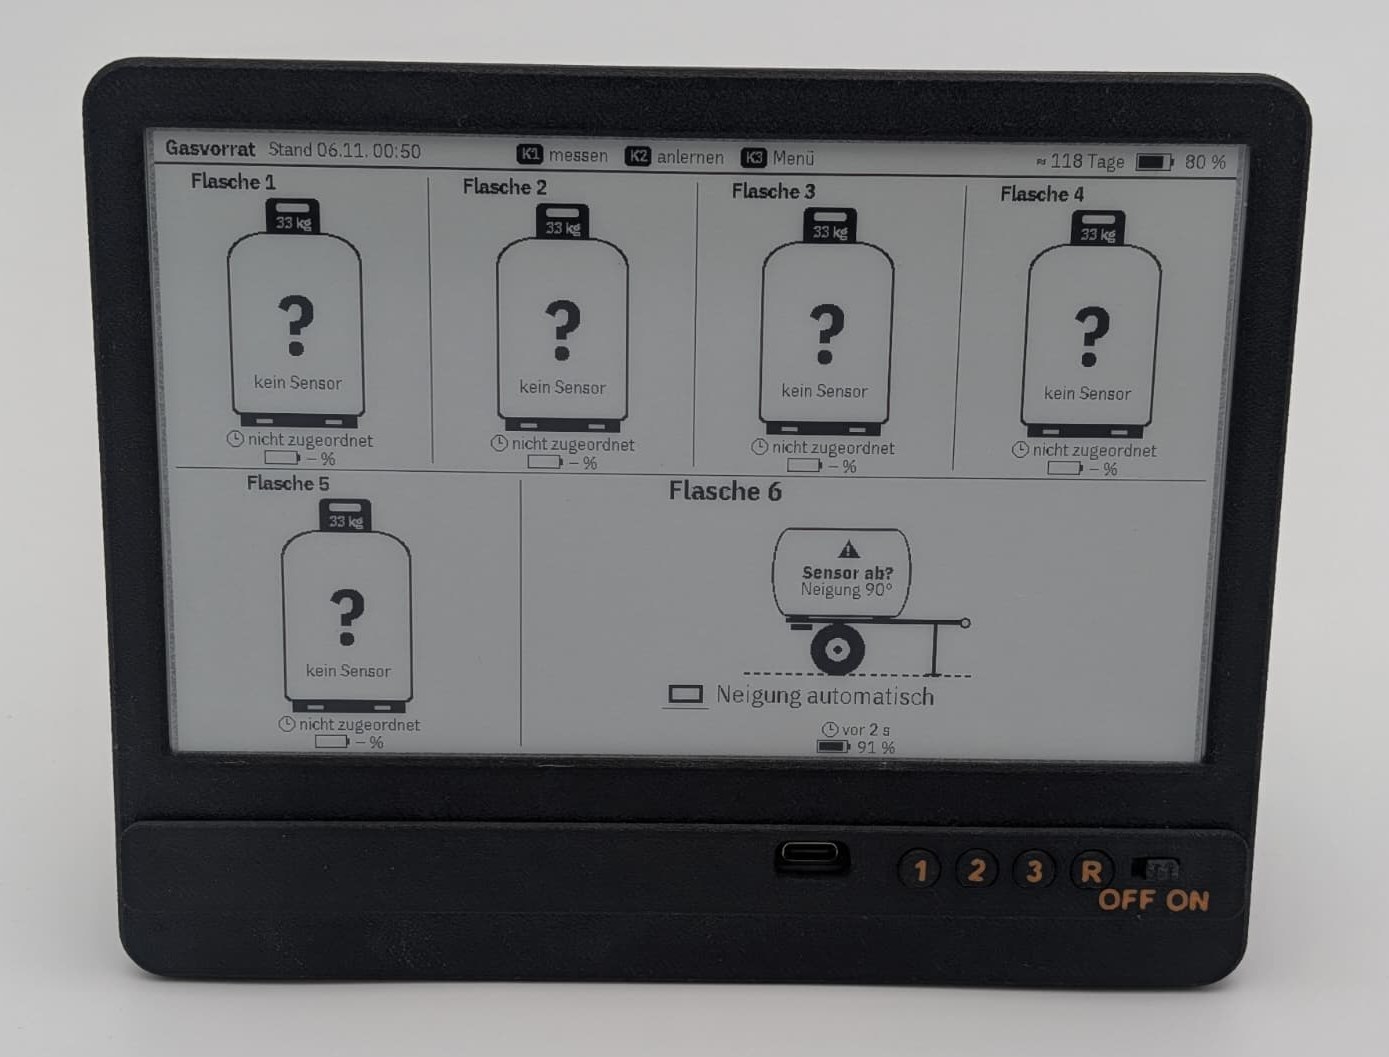
This is the third part of the series about the gas level display for our summer camp:
- Tent pole holder
- The sensor: teardown, reverse engineering and current measurement
- The Arduino software and first tests (this article)
In the last part I found out how the ultrasonic sensors under the gas bottles talk. What is still missing is the device that polls them all and shows the fill levels clearly.
The Hardware
The display is a TRMNL 7.5" DIY Kit: a black and white ePaper with 800 × 480 pixels, a driver board with a XIAO ESP32 S3 Plus, three buttons and a 2000 mAh battery. The goal was for the display to last at least four weeks without charging, i.e. a whole camp. I described the case and the current measurement in the article about my room display, and the holder for the tent pole in part one.
Instead of the TRMNL software, which loads finished images from the internet, the ESP32 runs a firmware of my own. There is no WiFi at the camp, and the sensors speak Bluetooth anyway.
From Test Sketch to Firmware
It all started with three small test sketches on an ESP32 C6, which were also my tools for the reverse engineering:
- v1 scans for sensors, splits up the advertisements and marks bytes that change. Result: there are no measurements in them.
- v2 connects, subscribes to the characteristic and logs the raw data with timestamps and the reason for disconnects.
- v3 decodes the values and converts them for water and LPG at the same time, including tilt and battery voltage. Via the serial console you can measure single sensors, poll all of them in turn or start a live view.
The actual firmware then grew out of v3. It is split into modules, among others for Bluetooth, volume calculation, display, menu, buttons, web interface, settings and power saving. For Bluetooth I use NimBLE Arduino, which is much leaner than the Bluetooth stack that comes with the ESP32. The display is driven by GxEPD2.
The Display
Design
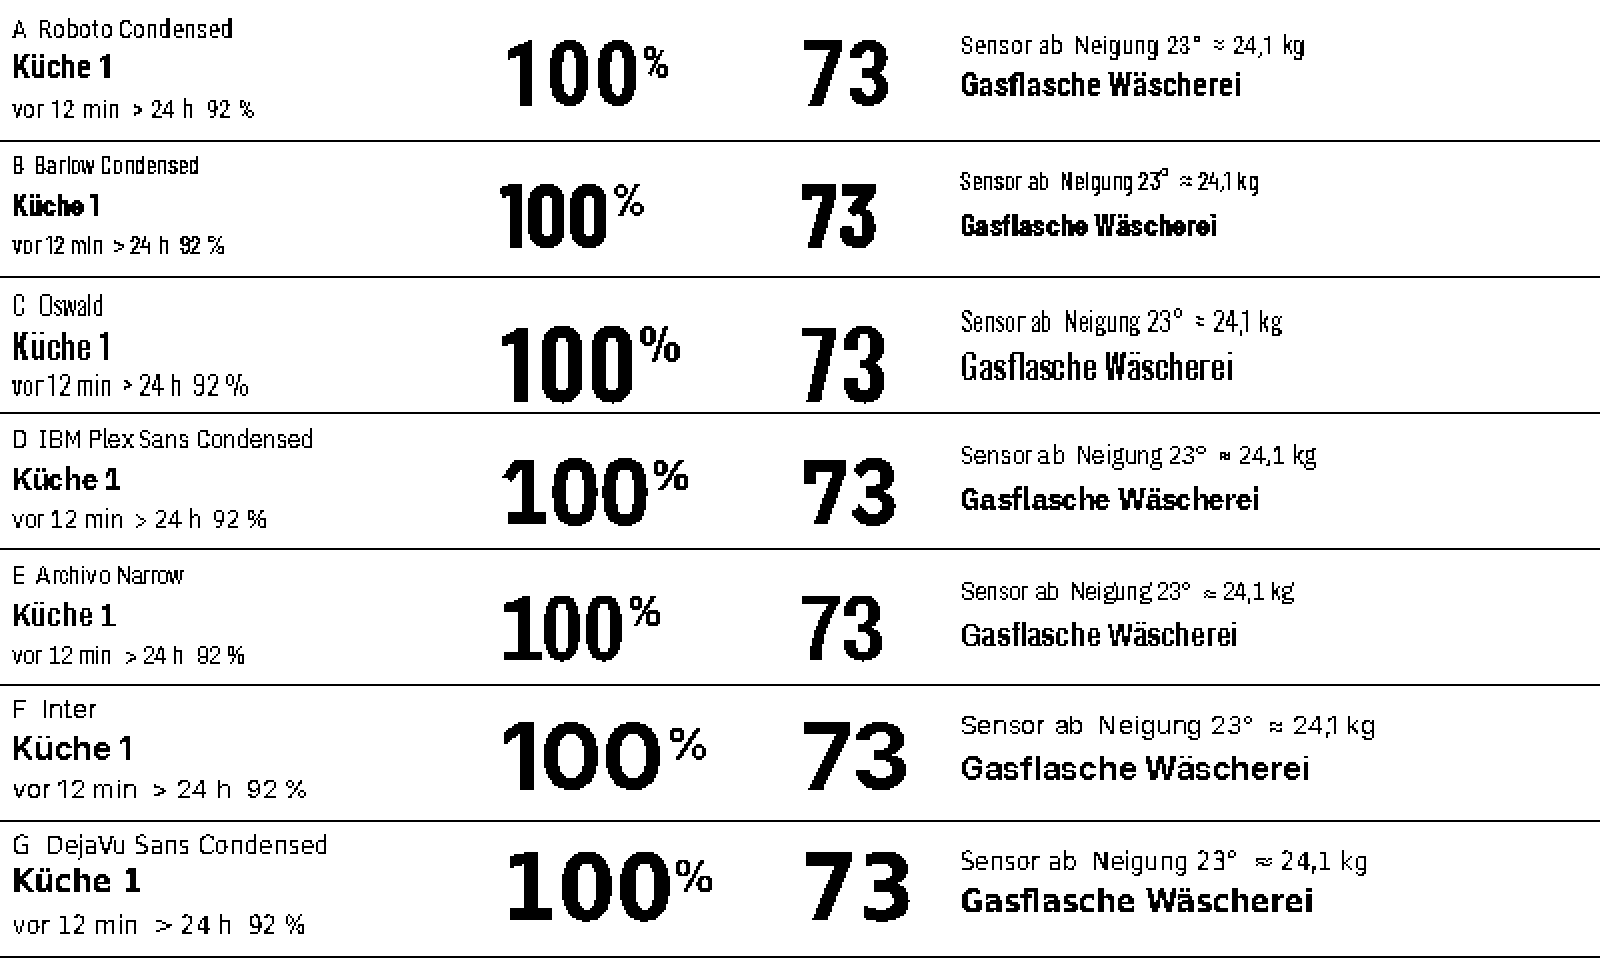
Before writing a single line of firmware for the display, I designed the layouts as SVG. That made it easy to compare variants. For the font, after comparing seven candidates, I chose IBM Plex Sans Condensed: narrow enough for a lot of text, but still easy to read at small sizes.
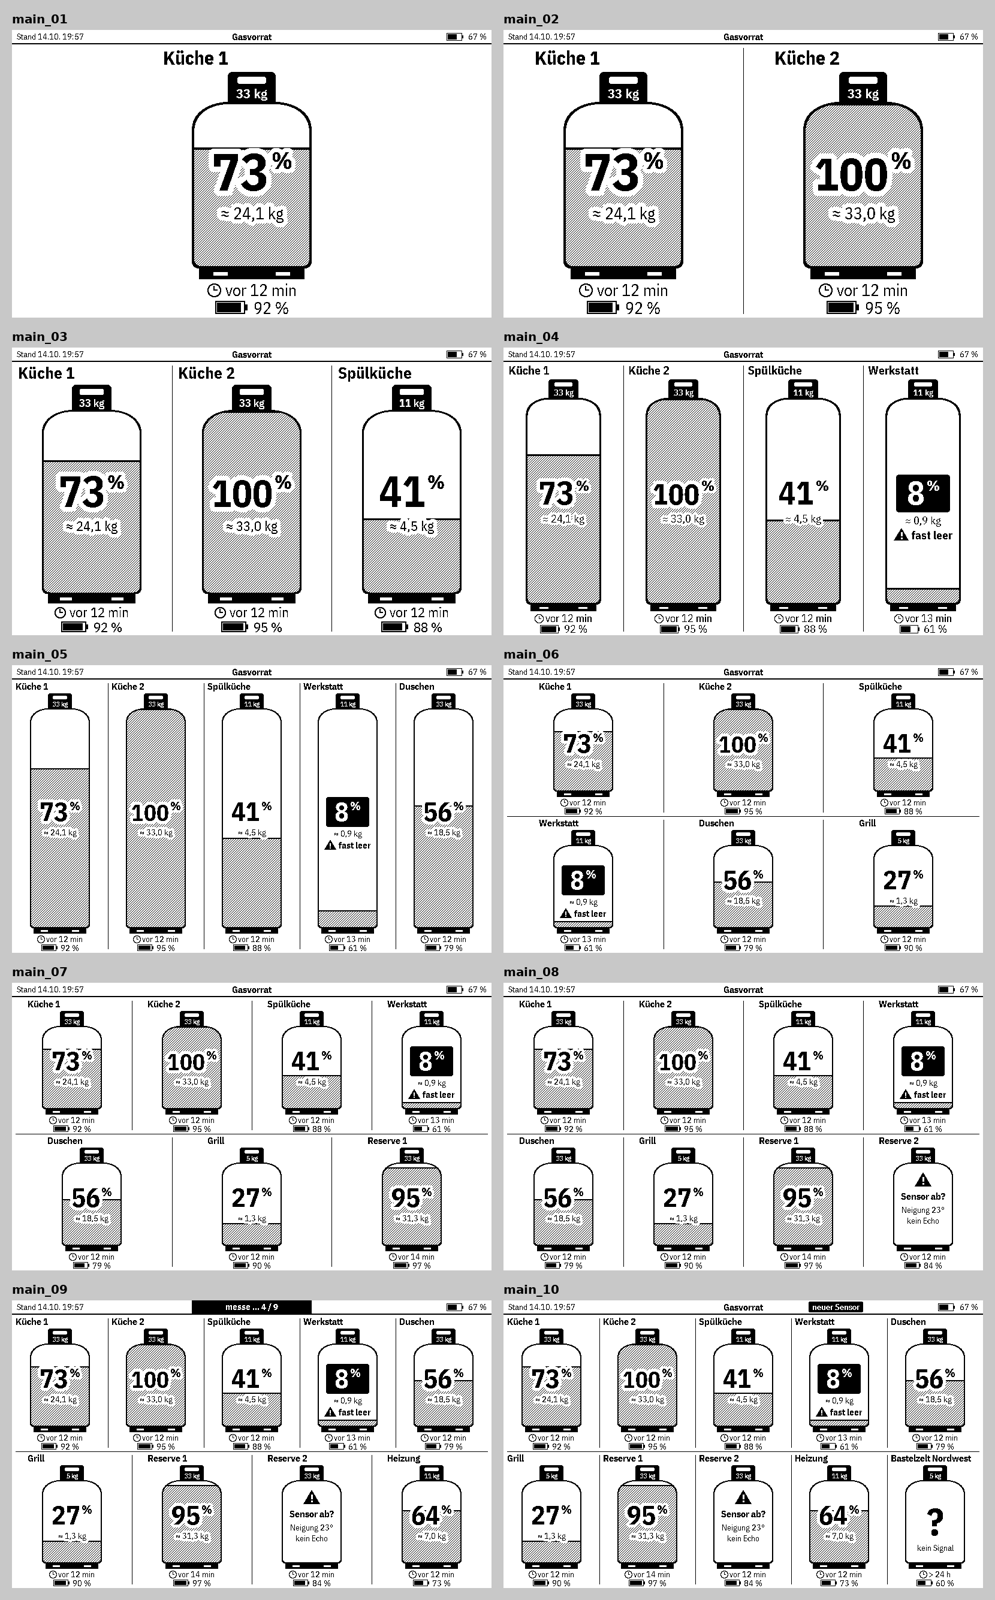
The display can only do black and white. Grey tones are therefore drawn as a pattern of diagonal lines with 25 % black. All bottle sizes share the same silhouette, and the size is written in white on the protective collar. Inside the bottle you see the fill level in percent and the remaining amount in kilograms, below it the age of the measurement and the battery level of the sensor.
There is a separate layout for every number of bottles from one to ten. Up to five bottles they stand in one row, from six on in two rows.
States
Each bottle can be in one of four states:
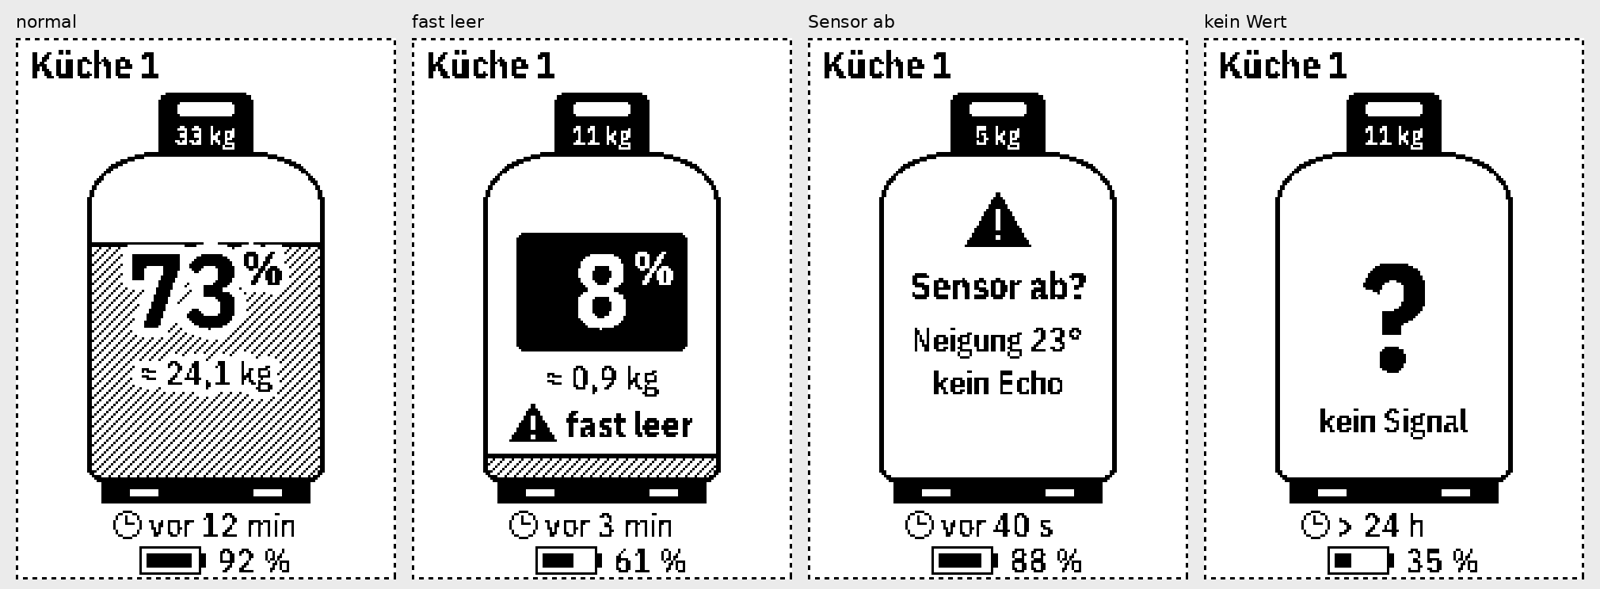
- normal
- almost empty: below 10 % by default, the percentage is inverted and a warning triangle appears
- sensor off?: if the tilt deviates clearly from the base tilt measured during pairing, or if no echo was detected because the values vary too much or lie above the bottle height
- no signal: if a sensor has not reported for too long, 2 hours by default
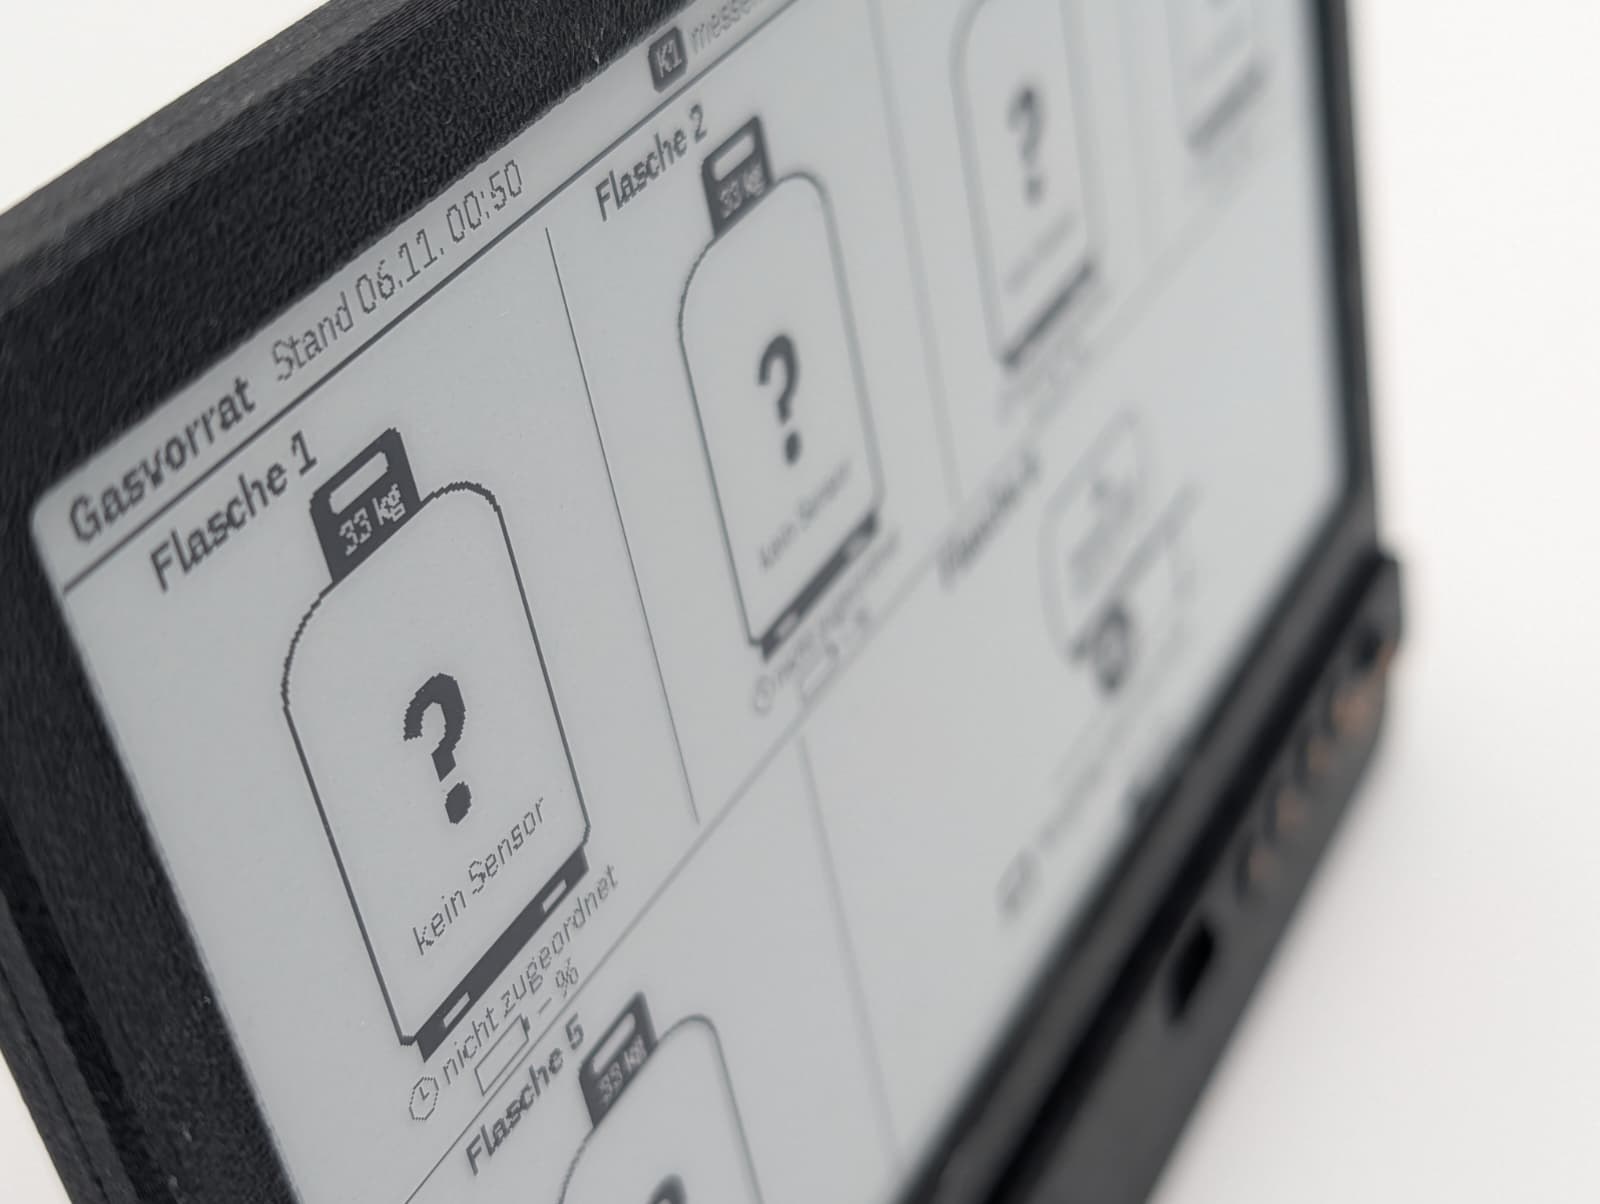
The header shows the time of the measurement, the battery level and the estimated remaining runtime of the display.
Measuring
Every 20 minutes the ESP32 wakes up from deep sleep and polls the sensors:
- Connect to up to three sensors at the same time
- Subscribe to notifications and wait for the first non zero value, which takes 7 to 10 seconds
- Keep listening for another 4 seconds to detect outliers and missing echoes
- Disconnect, retry on error
- Update the display and go back to sleep
On every sixth measurement, the display also searches for new, still unknown sensors for 4 seconds.
Real Remaining Amount Instead of Height
The sensor delivers a fill height. In the kitchen, though, what matters is how much gas is left. In an upright bottle with a domed bottom and shoulder, height and volume are not linearly related. So the firmware models each bottle as a cylinder with two ends shaped like half ellipsoids. The dimensions come from the product sheet of a gas dealer, minus about 3 mm of wall thickness:
| Size | Inner diameter | Capacity | Fill height when full |
|---|---|---|---|
| 5 kg | 223 mm | 11.8 l | 27.0 cm |
| 11 kg | 294 mm | 27.2 l | 34.2 cm |
| 33 kg | 312 mm | 79.0 l | 87.2 cm |
“Full” is the height at which exactly the nominal filling is in the bottle, calculated with a density of 0.51 kg/l for liquid propane. The percentage is the volume share between empty and full, and the remaining amount in kilograms follows directly from it. The factor from travel time to height is 2.13 by default, as in the app, and can be corrected in the settings.
Operation
| Button | Main screen | Menu | Editing a value |
|---|---|---|---|
| 1 | measure now | next entry | less |
| 2 | pair sensor | select | more |
| 3 | menu | back, long press: main screen | confirm |
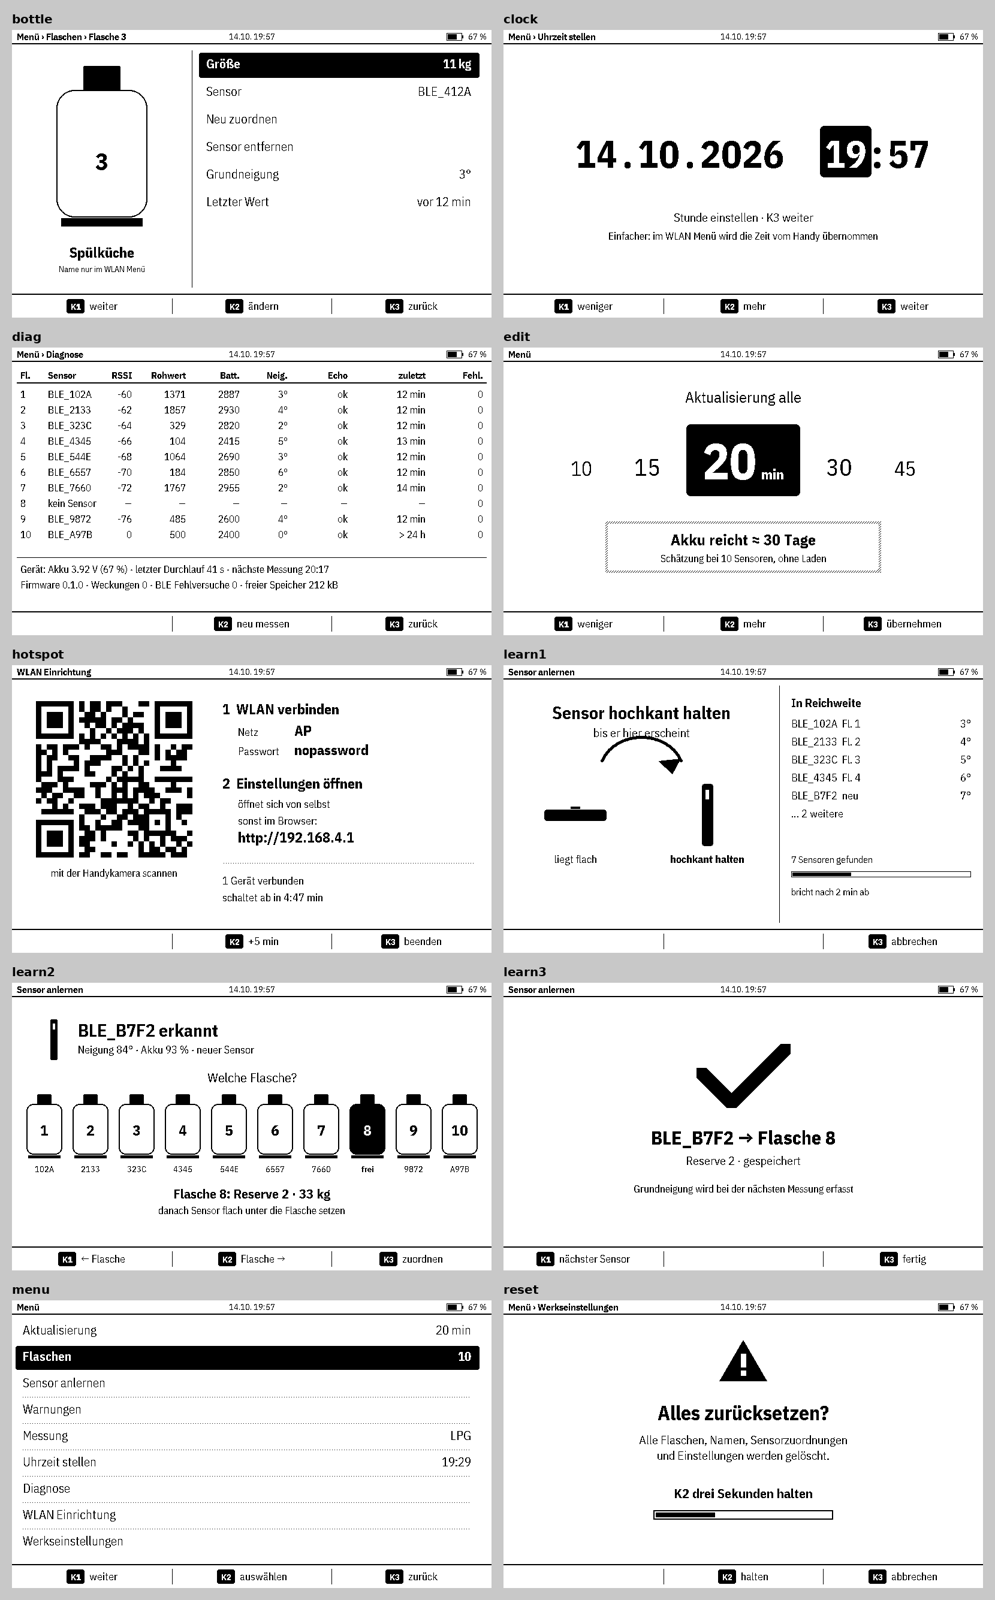
Pairing Sensors
How does the display know which sensor sits under which bottle? The sensors all look the same and are only called BLE_ plus a few characters of the MAC address. This is where the accelerometer from the last part helps: to pair, you simply hold a sensor on edge for a moment. The display looks for the sensor that is currently tilted by more than 60°, you pick the bottle, and the assignment is stored permanently.
Web Interface
For everything that is tedious to set with three buttons, there is a web interface. For that, the display opens its own hotspot called “Gasanzeige”. A QR code appears on the display, you connect with your phone and land directly on the settings page through a captive portal. There you can set names, sensors and bottle sizes, back up the settings and upload new firmware. The display also takes the time from the phone, since there is no internet for a time server at camp. After 5 minutes the hotspot switches off again to save power.
Bonus: The Water Tank
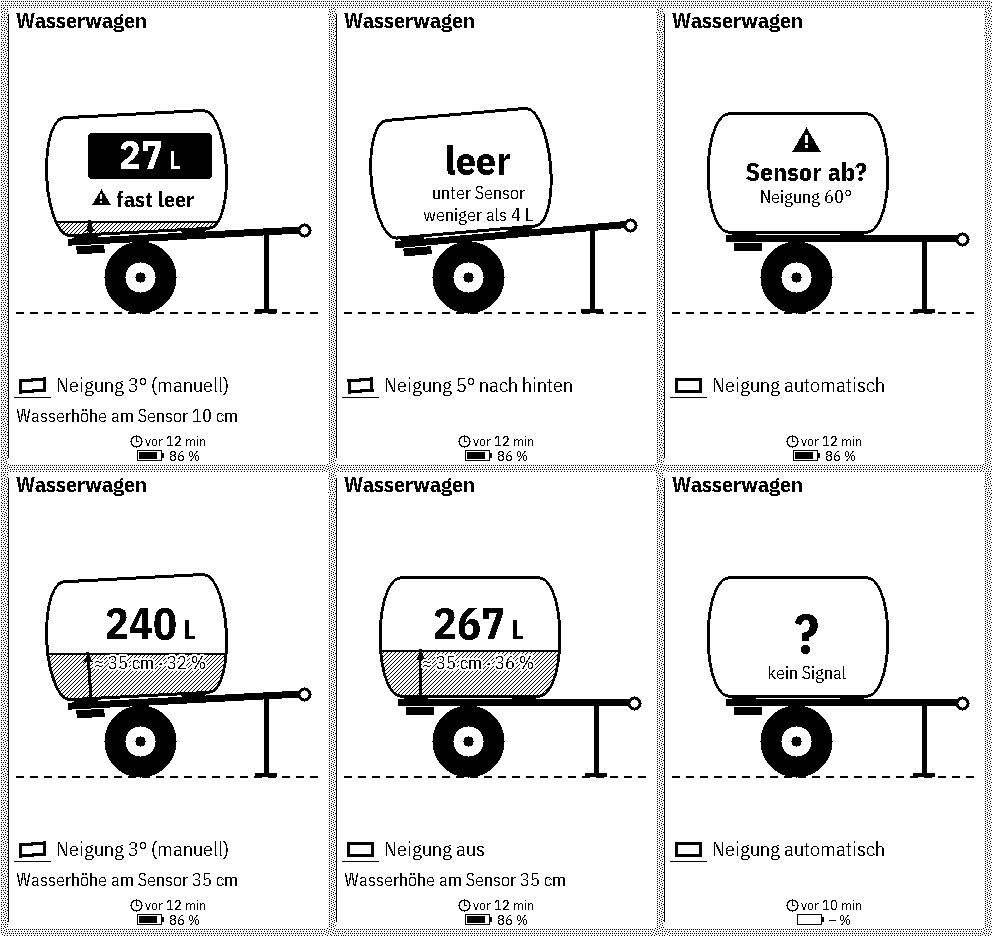
Since the drinking water is a constant mystery too, from version 0.1.8 on one slot on the display can be the water tank on the trailer instead of a gas bottle. It takes up two slots and has its own symbol: a trailer seen from the side with tank, water, sensor and measuring beam.
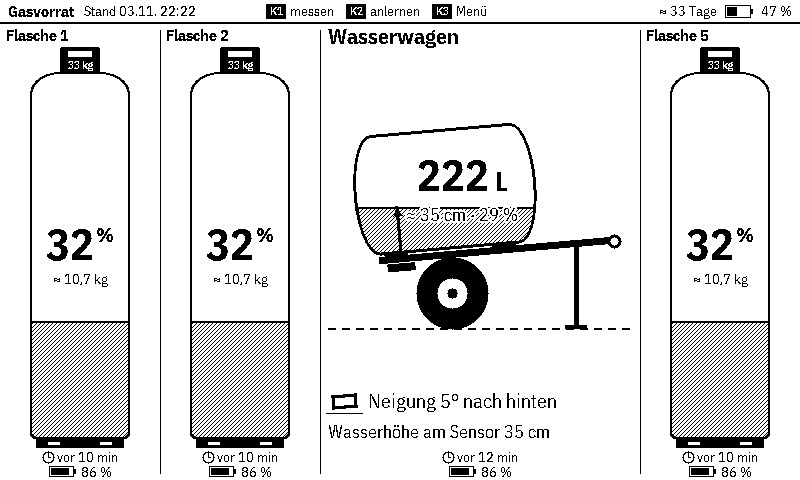
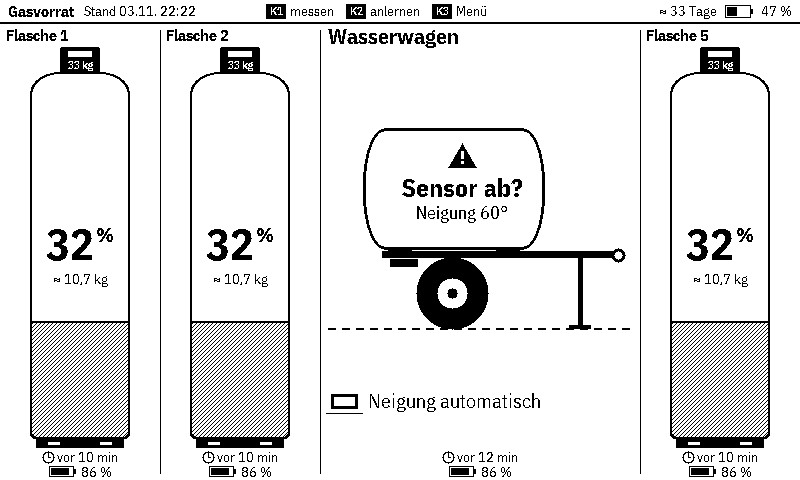
The tank is a horizontal cylinder with domed ends, and it is usually tilted backwards so the water drains. The firmware takes both into account: inner diameter, length, shape of the ends and the position of the sensor are entered, and the tilt can be off, entered by hand or taken automatically from the sensor. Since the sensor only delivers whole degrees, some uncertainty remains: a tilt error of 1° means about 1.7 cm of water height at 1 m distance from the sensor.
Is the Battery Enough?
Without sensors, the display lasts about 285 days at a 20 minute interval, measured. How much charge one query per sensor costs on the display side, I have not measured yet. The firmware conservatively assumes 0.06 mAh per sensor and query. That would mean about 60 days with five sensors and about 34 days with ten. So the four week goal would be reached even with ten bottles.
The real test comes in August at the camp, with real bottles, a real kitchen and real weather. There will be a separate article about it.
Build Your Own
- Gas display firmware (version 0.1.9) with README and tools
- Test sketches v1 to v3 for the ESP32 C6
- Layout generator with all SVG drafts
I compiled with the Arduino IDE, ESP32 Core 3.3.12, NimBLE Arduino 2.5.1 and GxEPD2 1.6.9 (with Adafruit GFX). Select XIAO_ESP32S3_PLUS as the board, “Default with spiffs (3MB APP/1.5MB SPIFFS)” as the partition scheme so the update over WiFi works, and enable “USB CDC On Boot”. As long as a computer is connected via USB, the display does not sleep and shows “USB”, so new firmware can be uploaded easily.
The hotspot password is hard coded to “nopassword” in the firmware. If you want to change it, you will find it in config.h.
The software is licensed under the MIT License. You may use, modify and share it freely, even commercially, as long as the license notice is kept.
If you have questions or need other file formats, feel free to write to me: loading …
Conclusion
A few test sketches turned into a fairly complete firmware: it polls up to ten sensors, calculates real remaining amounts, detects sensors that fell off and can be operated both on the device and from a phone. On my desk all of this already works. Whether it also holds up at camp between cooking pots, gas bottles and hungry kids, I will show in August.