This is the second part of the series about the gas level display for our summer camp:
- Tent pole holder
- The sensor: teardown, reverse engineering and current measurement (this article)
- The Arduino software and first tests
How Do You Measure How Much Gas Is Left?
Since we also want to rebuild the holder for the gas bottles next year, my first thought was to measure the fill level by the remaining weight with load cells. At first glance that is elegant: load cells are cheap, low power and fairly easy to read. While designing the bottle holder, though, I quickly noticed how much this seemingly simple solution complicates the rest of the design. For the load cells to measure properly, the bottle has to rest on the sensor with its full weight, so it must be able to move fairly freely vertically while being held securely horizontally. On top of that, the whole thing has to be anchored in the ground and be waterproof. You soon find yourself looking for waterproof linear rails and realise that it is no longer practical.
So one step back: what do we actually want to measure? We want to know how much gas is left in the bottle. That can be estimated from the weight, but also from the volume of the liquid phase. Most of the propane sits as a liquid at the bottom of the bottle, only a small part is gaseous at the top. When gas is drawn off at the top, part of the liquid evaporates and refills the volume. So as more gas is used, the liquid level keeps dropping.
You can see this nicely when a lot of gas is drawn: evaporation takes a lot of energy, the liquid propane cools down strongly, and the outside of the bottle gets very cold wherever there is still liquid inside. But turning the burner up all the way just to check how much gas is left is not always practical. We still want to see at what height the level is, and that is exactly what ultrasound can do.
An ultrasonic sensor under the bottom of the bottle sends a sound pulse up through the steel wall and measures how long the echo from the liquid surface takes. The fill height follows from the travel time, without opening or connecting the bottle.
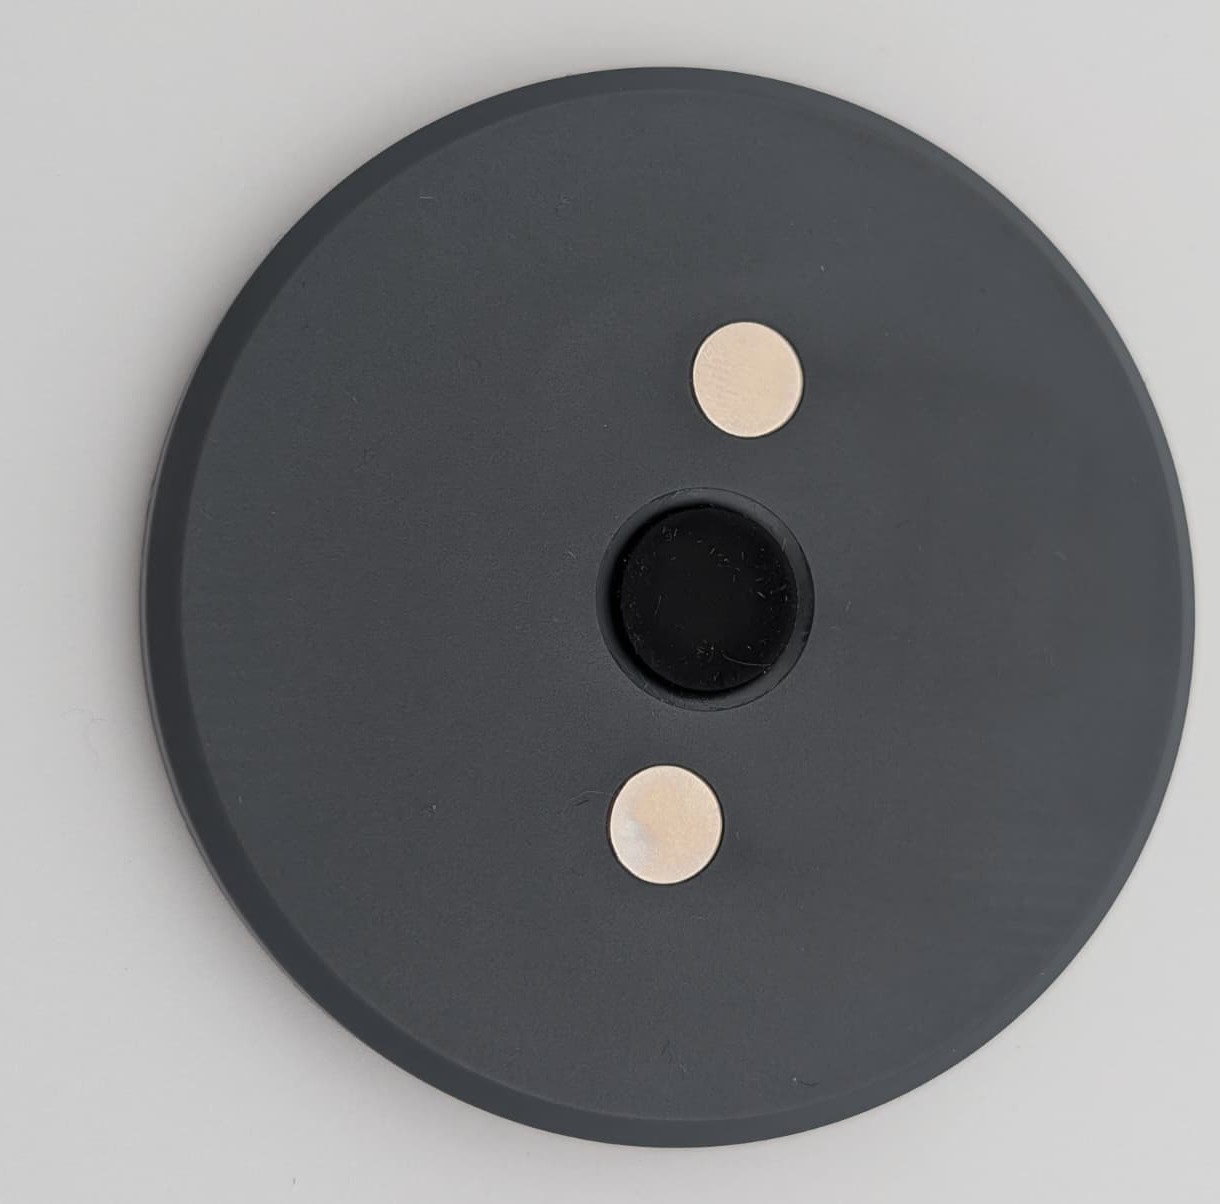
The well known sensors for this are made by Mopeka. My goal, however, was to build the whole thing as cheaply as possible. So I first bought a single, much cheaper LPG2412 BT for about 52 € from AliExpress, to take it apart and find out whether it can be read without the app. It is 72 mm in diameter, about 12 mm thick and is attached to the centre of the bottle bottom with two magnets and a coupling adhesive. According to the manual it measures from 5 cm to 2 m and works with LPG, water and oil. Normally you read it with the Tank IoT app.
However, I did not want to see the values in an app on my phone, but on a display in the kitchen tent, for all bottles at once. For that I had to find out how the sensor talks.
Teardown
Opening
The housing is closed with a bayonet. You hold the lower half with the sound side and turn the upper half with the transparent button in the direction of the arrow. That sounds easier than it is, because the closure is very tight. The best way is to brace the back with its two protrusions against a piece of wood, for example the edge of a table or a beer bench, and then twist it open with a lot of force and pressure until the mark on the side moves from closed to open. After that the upper half lifts off. Two small notches across the seam show when the housing is properly closed again: then they line up exactly.
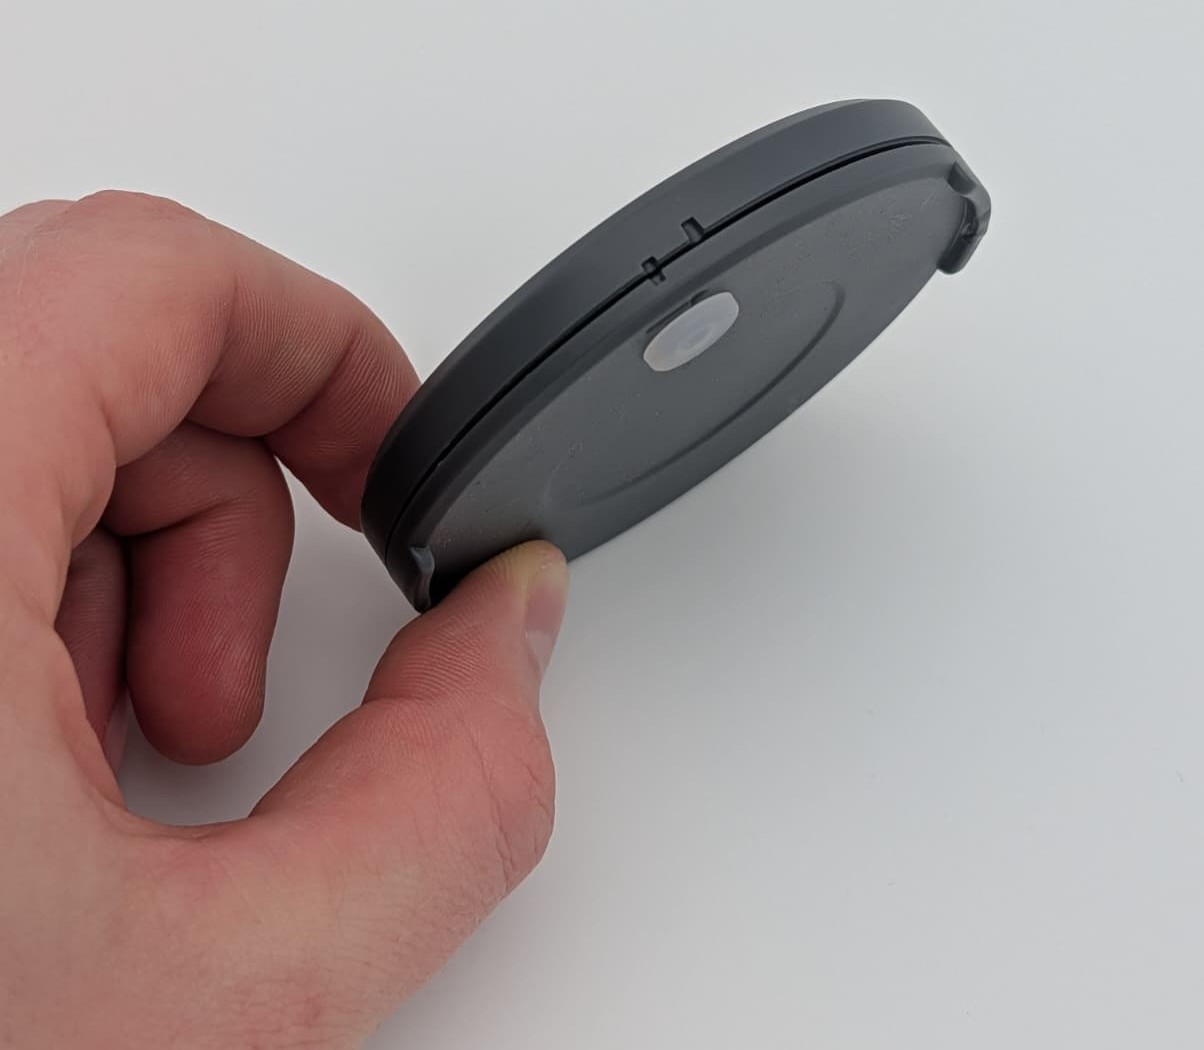
A red O ring seals the housing. When closing it, it has to sit cleanly and untwisted in its groove.
What Is Inside
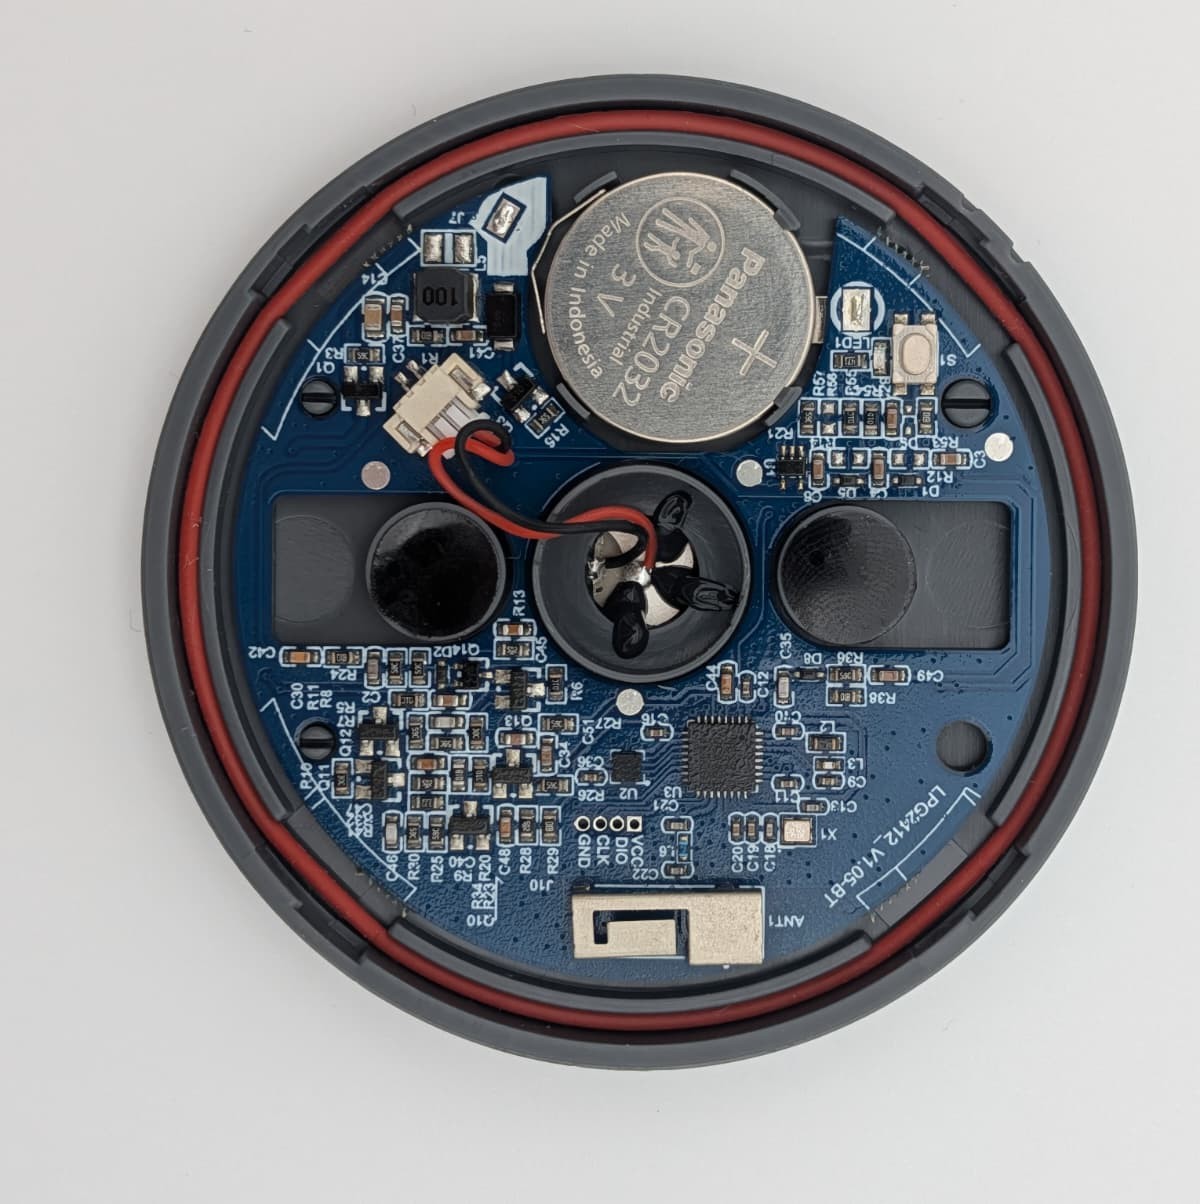
The sensor is powered by a CR2032 coin cell, in my unit a Panasonic in the Industrial version. As a replacement I would again use an Industrial or brand cell, since nights at camp can get cold.
The piezoelectric ultrasonic transducer sits in the centre, connected to a small plug via a red and a black wire. The two holding magnets sit to its left and right. On the board there is the analogue section with transmit and receive path, plus a small boost converter with a 10 µH inductor that generates the higher voltage for the sound pulses. Under the transparent cap there is a push button with an LED next to it.
The Radio Chip
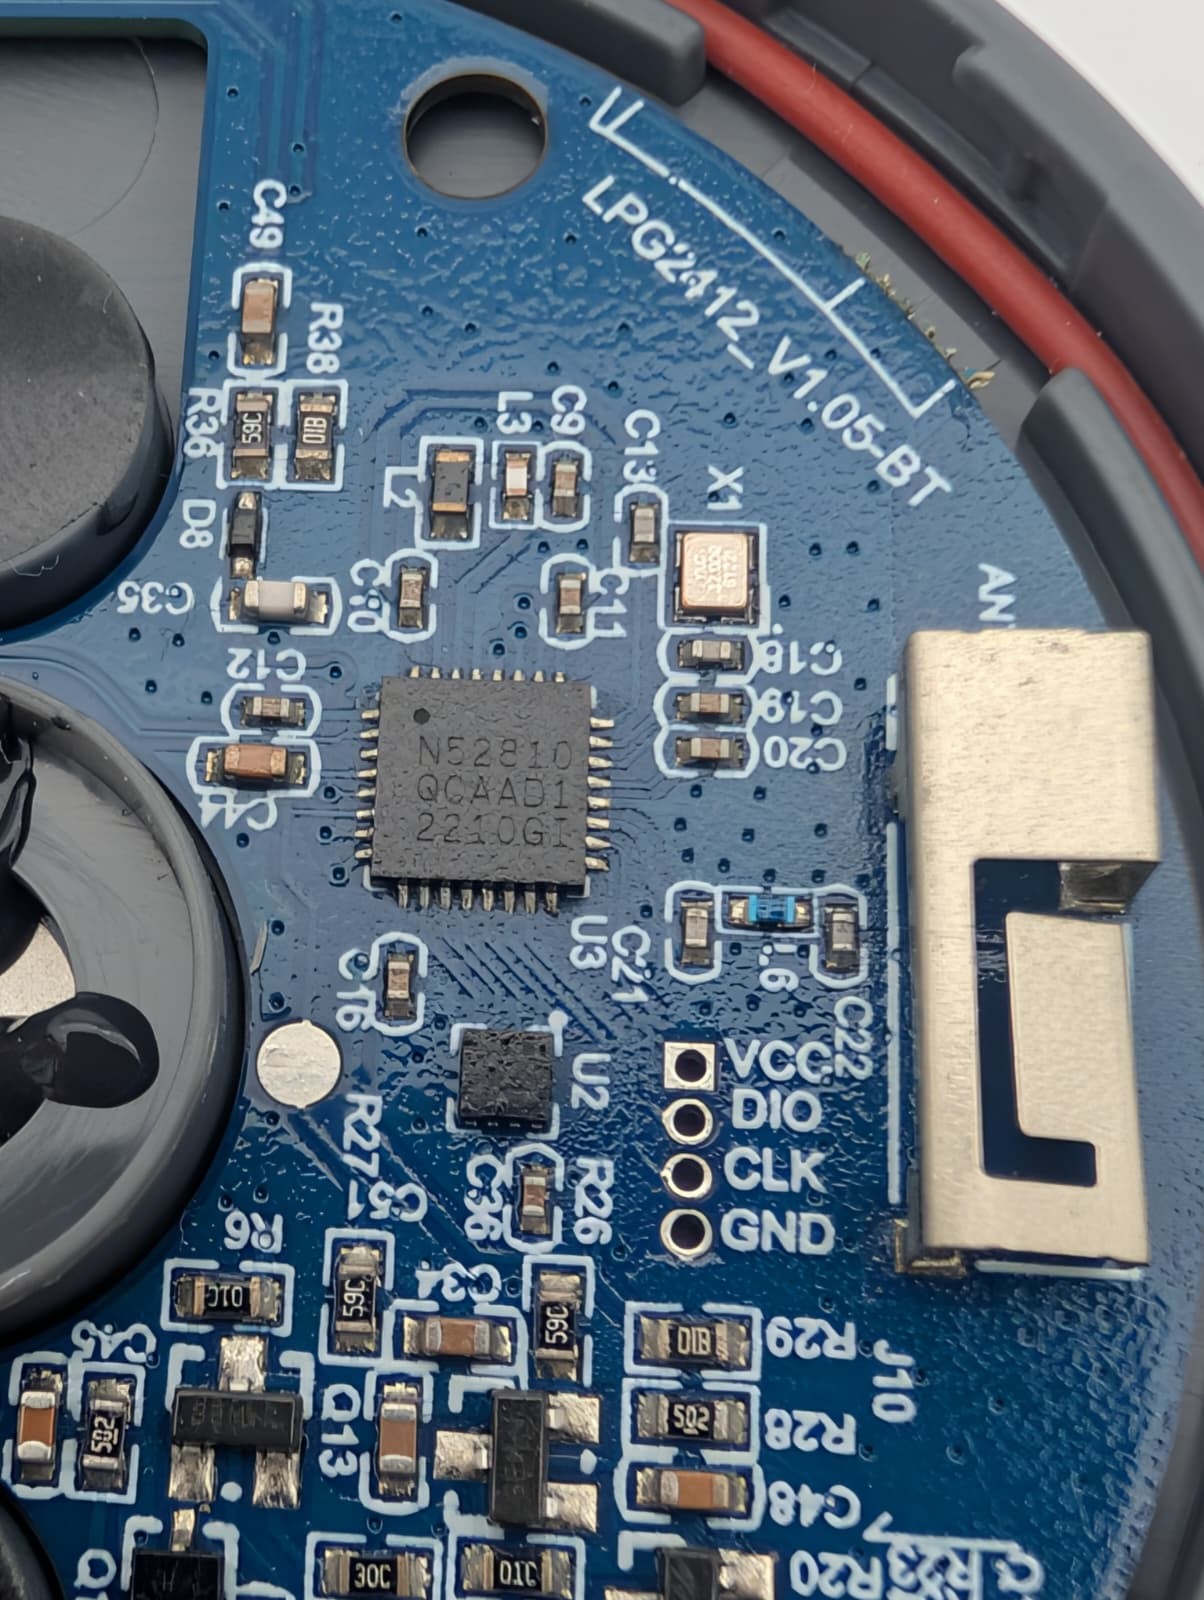
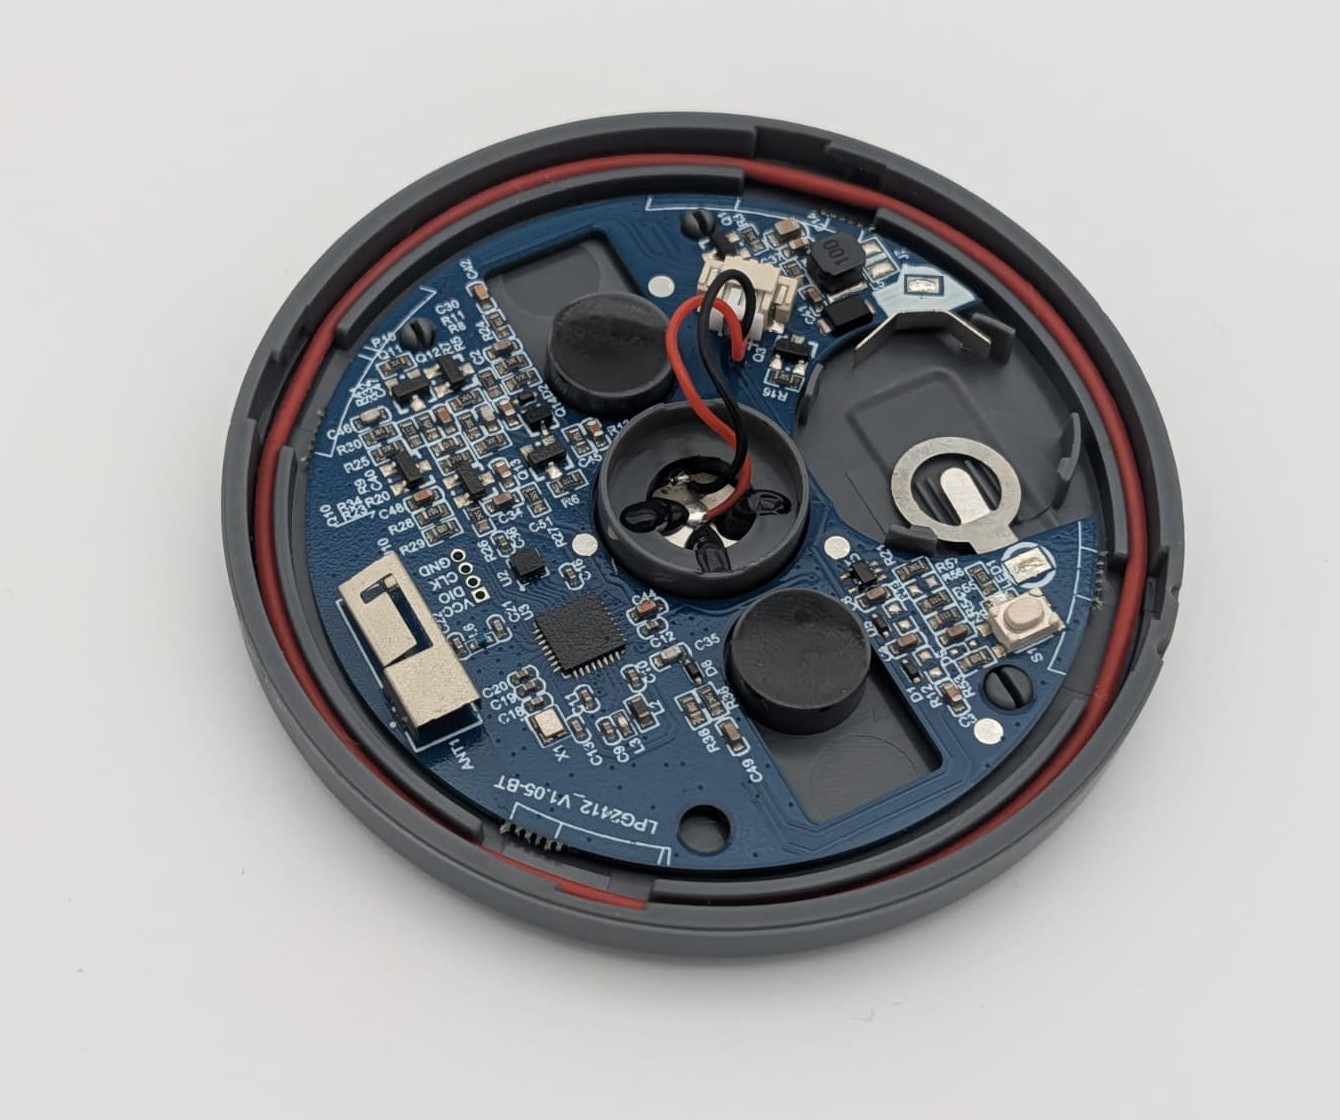
The heart of the board labelled LPG2412_V1.05 BT is a Nordic nRF52810, a Bluetooth Low Energy chip with an ARM Cortex M4. Next to it sit a 32 MHz crystal and, on the right, a chip antenna. The small chip below it is an accelerometer that the sensor uses to measure its tilt.
The four solder pads next to it are interesting: VCC, DIO, CLK and GND. That is the SWD interface, which lets you program the chip and, if necessary, read it out. In the end I did not need it, because the radio protocol is not encrypted.
Reverse Engineering
What the Sensor Broadcasts
First I used nRF Connect on my phone and a sketch of my own on an ESP32 C6 to look at what the sensor sends on its own. The sketch splits every Bluetooth advertisement into its fields and marks bytes that change.
Result: the sensor announces itself every 2 seconds. Its name consists of BLE_ and the first two bytes of its MAC address, for example BLE_EE2A. But these packets contain no measurements, not a single byte changes. To find the sensors nearby, a filter on the name is still enough.
Connecting and Listening
So to get the measurements you have to connect. The sensor offers exactly one custom service with a single characteristic:
- Service:
00001123-1212-efde-1523-785feabcd123 - Characteristic:
00001124-1212-efde-1523-785feabcd123, read and notify
If you have worked with Nordic chips before, you will recognise the UUID: it comes from the “LED Button Service” example in the Nordic SDK, only slightly modified.
The first attempt still failed. After connecting, my sketch dutifully read the standard services first, and before it reached the vendor service, the sensor had already disconnected. Only when the sketch queried the vendor service first and subscribed immediately did the first data arrive.
Once you subscribe to notifications, the sensor sends a 10 byte packet about every 0.5 s. No write command and no pairing are needed. A few quirks I had to learn along the way:
- If you do not subscribe quickly after connecting, you get disconnected after a few seconds.
- A plain read of the characteristic returns the value of the last connection, not the current one.
- After connecting, only zeros arrive at first. The first fresh measurement comes after 6 to 10 seconds. So only non zero values are usable.
- Under a steel wall the signal is weak and connections drop now and then. Retries are a must.
What Is in the 10 Bytes
Some of it could be figured out by trial and error. When you tilt the sensor, bytes 4 to 7 change, so that is the tilt. Bytes 8 and 9 were around 2900 and dropped slightly under radio load, which smelled like battery voltage in millivolts.
It became fully clear with a look into the app. I pulled it from my own phone via adb. Tank IoT is built with uni app, the actual logic sits as JavaScript inside the APK and can be read just like that. There I found the decoding:
| Bytes | Type | Meaning |
|---|---|---|
| 0 to 3 | int32, little endian | fill height in mm, relative to water |
| 4 to 5 | int16, little endian | tilt y in degrees |
| 6 to 7 | int16, little endian | tilt x in degrees |
| 8 to 9 | int16, little endian | battery voltage in mV |
By the way, the sensor itself does not know what is in the bottle. It measures the travel time and calculates with the speed of sound in water. All settings from the app, such as medium, tank shape and dimensions, stay in the app and are never sent to the sensor.
From Raw Value to Fill Level
The conversion is also in the app code:
- Water and oil: fill height in mm = raw value
- LPG: fill height in mm = raw value / 2.13
- Battery in percent: (voltage in mV − 1500) / 1500 × 100, so 2887 mV corresponds to 92 %
The factor 2.13 is the ratio of the speeds of sound: sound travels about twice as fast in water as in liquid propane. The app uses this fixed value. But the speed of sound in LPG depends noticeably on temperature and mixture, with a difference of several percent between summer and winter. That is why the factor can be corrected in my own software.
One more interesting detail: the percentage shown in the app is the share of the height, not the volume. For an upright bottle with a domed bottom and shoulder, that is not the same thing. So my display calculates with the real bottle geometry, more on that in part three.
The Tilt
The accelerometer provides two angles, one per axis. From these, the total tilt from vertical can be calculated:
θ = asin( √( sin²x + sin²y ) )
A series of measurements with the sensor in my hand:
| Position | x | y | Tilt θ |
|---|---|---|---|
| normal, sound side up | −1° | −3° | about 3° |
| upside down | +6° | 0° | about 6° |
| on edge, button up | −41° | −48° | about 88° |
| on edge, button down | +31° | +59° | about 90° |
This leads to a small disappointment: flat and upside down cannot be told apart. A sensor that fell off the bottle and lies flat on the ground looks exactly like a mounted one. What is easy to detect, though, is a sensor standing on edge or hanging at a clear angle. I use that in two ways later: as a “sensor off?” warning and for pairing, because the display recognises a specific sensor by you briefly holding it on edge.
Measuring the Current
That leaves the question of how long the coin cell lasts when the display asks every 20 minutes.
Setup
Instead of the CR2032, the Power Profiler Kit II supplies the sensor again, this time with 3.00 V. I simply held the measurement leads on the contacts of the battery holder with a small magnet. A XIAO ESP32 S3 with a small test sketch does the queries. It polls the sensor at the same rate as the gas display and sets a marker pin HIGH during each connection. That way every query can be matched exactly in the trace.
Without Queries
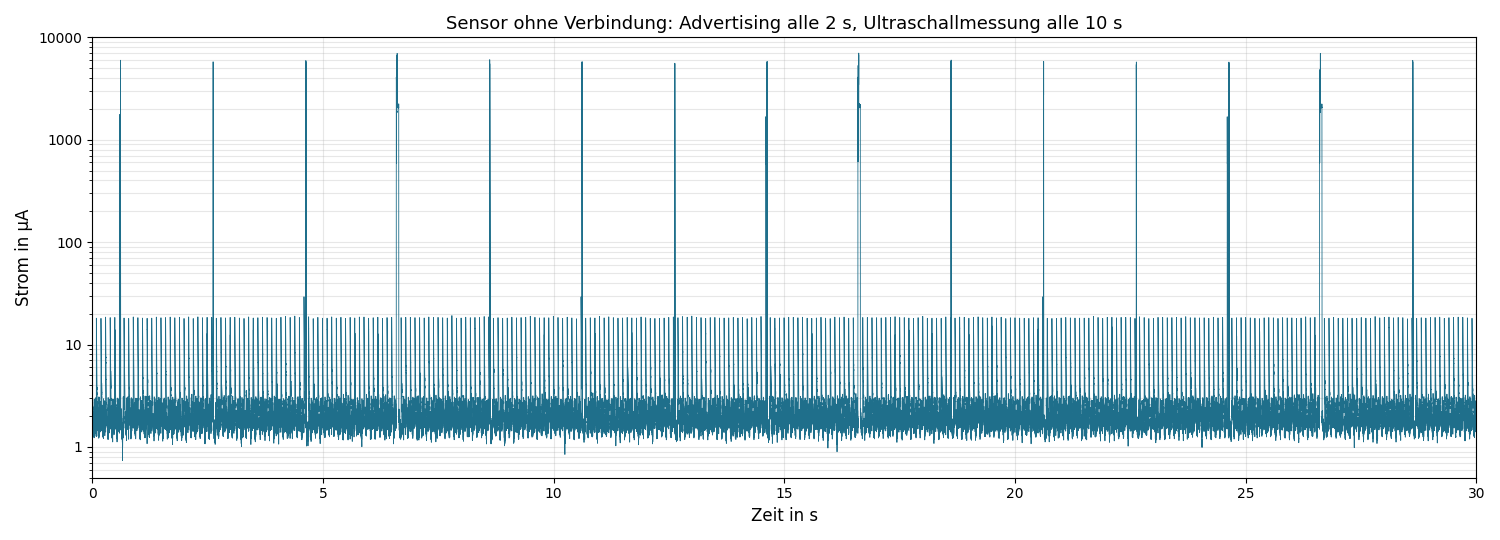
Without a connection the sensor draws 20.9 µA on average. Between events it is only about 2.7 µA. Every 2 seconds there is a small spike for advertising, every 10 seconds a larger one: so the sensor keeps measuring by itself, even when nobody asks.
One Query
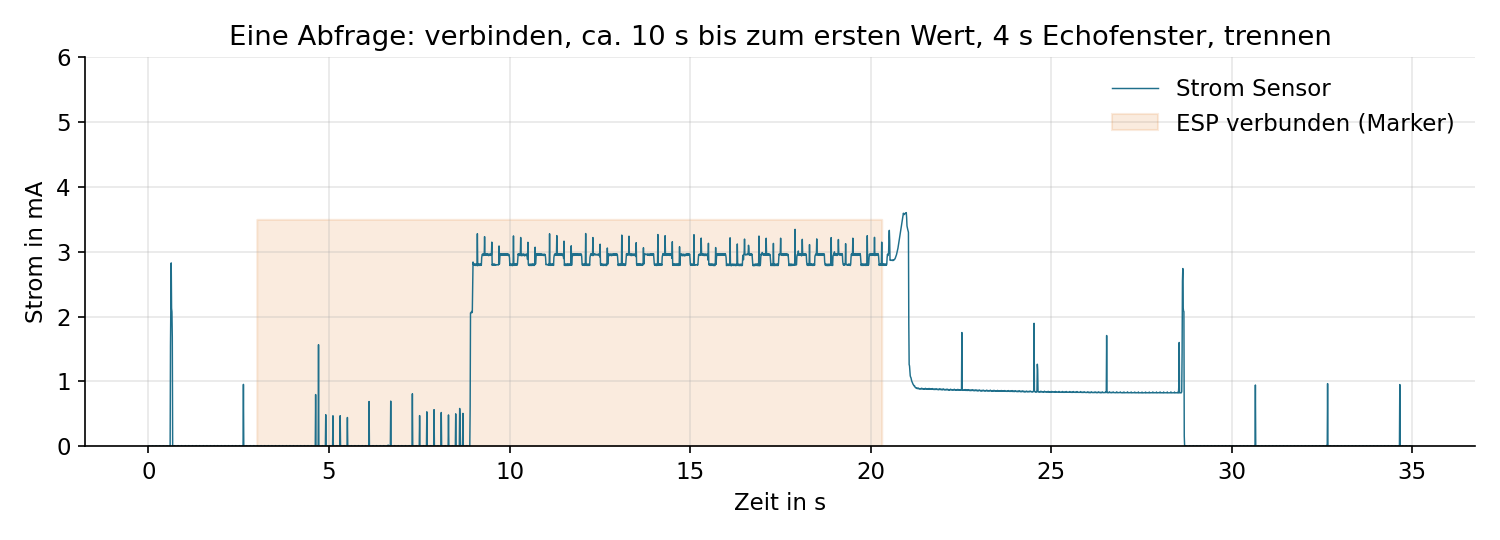
While connected, a steady current of about 2.9 mA flows. The first measurement arrives about 9.6 s after connecting. After disconnecting, the sensor still draws around 0.85 mA for about 8 seconds. And roughly every fifth attempt delivers no value at all.
Failed attempts, on the other hand, cost the sensor almost nothing: the trace shows no extra current at all for them, so the sensor never accepted the connection.
After the first value, my firmware keeps listening for another 4 seconds to detect outliers and missing echoes. This echo window does cost quite a bit though:
| Measurement | Average current | Charge per query |
|---|---|---|
| no queries, 10 min | 20.9 µA | |
| query every minute, with echo window | 693 µA | 14.0 µAh |
| query every minute, without echo window | 300 µA | about 9 µAh |
So without the echo window the sensor saves about 5 µAh, a good third per query. Curiously, in the recording without echo window the sensor stopped accepting connections after about nine minutes, and the last six attempts came back empty. I do not know the reason yet.
By the way, the reported battery voltage was 2970 to 2980 mV at a 3.00 V supply. So the sensor’s voltage measurement is quite accurate.
How Long Does the Coin Cell Last?
A CR2032 has about 220 mAh, of which I count 80 % as usable. In the cold or with high pulse loads it can be as little as 60 %. With one query every 20 minutes:
| with echo window | without echo window | |
|---|---|---|
| Runtime | about 117 days | about 150 days |
That is plenty for one camp season. Since the sensor keeps measuring even without queries, the coin cell lasts only just under a year on the base load alone. So the easiest thing is to replace it before every camp.
What to Watch Out for on the Bottle
- German gas bottles have a domed bottom with a foot ring. The sensor has to sit in the centre, and you should check beforehand whether the 12 mm fit under the bottle.
- There is a dead zone of about 5 cm at the bottom. The app already shows 0 % while there is still gas in the bottle.
- Bottles are only filled to about 80 % with liquid. The maximum value should be calibrated with a fresh bottle.
- When a lot of gas is drawn, condensation or frost can form on the bottom. This disturbs the coupling.
- After changing a bottle the liquid is still sloshing, so the first values should be ignored.
Build Your Own
- Test sketches and measurement tools: exploration sketch for advertising and GATT, sketch for the current measurement, analysis script for the PPK2 and the measurement results
You can find the sensor on AliExpress by searching for “LPG2412 BT”.
The sketches and scripts are licensed under the MIT License. You may use, modify and share them freely, even commercially, as long as the license notice is kept.
If you have questions or need other file formats, feel free to write to me: loading …
Conclusion
For a little over 50 €, there is a surprising amount in this sensor: a modern Bluetooth chip, an accelerometer and a solid ultrasonic measurement. And since the protocol is not encrypted, it could be fully decoded with some patience and a look into the app. Less nice are the long wait until the first measurement and the queries that come back empty about one in five times. The software has to deal with that.
How it does that is covered in part three.